Digital photography is an amazing medium. The rate in which quality and performance are increasing is staggering, and the possibilities are endless. It's as if the digital age has opened up an entirely new world of thinking; I'm constantly amazed at the new things I see and how modern-day photographers push the envelope to create mind-blowing work that borders on the bleeding edge.
I had been primarily a wildlife photographer until a few years ago when I started spending more time focusing on nature landscapes. I found landscape photography enjoyable. I also found it to be challenging when trying to find my own unique take on the classic vista points and well-photographed national parks.
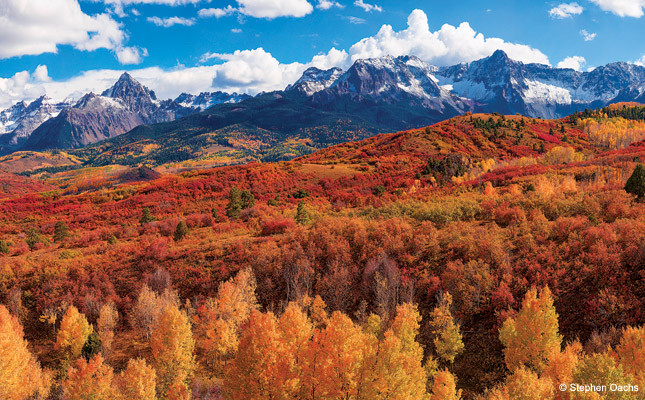
 To make his massive image files, Stephen Oachs shoots a series of individual frames, which are then stitched together. The process isn't especially complicated, but it does require solid technique, attention to detail and some special equipment. The results are stunning. |
I chose panoramic images as my first attempts in finding my own landscape style, yet my end results just felt like the same work everyone else was capturing, except wider. Then I stumbled into the world of multi-row panoramics, and I was addicted.
My newfound passion wasn't so much due to the expansive views multi-row panoramas provide, but for the ability to achieve extreme resolutions that allow me to create very large prints (10- to 15-foot widths and larger) while still showing extremely sharp, non-pixelated results. Imagine being able to view a supersized panoramic image from just a few inches away and having it be tack-sharp! That's exactly what I've been able to achieve by mastering the skills required to produce high-quality panoramic images.
In addition to the extreme resolution and endless printing possibilities, I also love the amount of depth and sense of scale you can achieve with multi-row panoramas. By capturing multiple images with a telephoto lens, the final "stitched" result offers up unique perspectives, even with the most iconic, and highly photographed, locations. The reason for this is telephoto compression—where the near and far of a scene appear to be closer together, making distant objects larger, so when you stand before a large print, it gives the photo an almost three-dimensional feel. This visual bonus can only be achieved by taking a multiple-image panorama.
What's A Panoramic Photograph?
Panoramic photography in our modern digital world consists of capturing multiple images in a sequence, then combining them (in a process called "stitching") to form a single final image.
The word "panorama" literally means "all sight" in Greek and first originated from artists and painters to convey a wider view of a scene. Early panoramic photographs were created by aligning printed versions of film; it proved to be difficult to align each frame perfectly for a quality end result. However, with today's powerful computers and digital software tools, it's now much easier to stitch digital images together. In fact, using the techniques I'll outline in this article, it's possible to create flawless panoramas and achieve extremely high-resolution results.
Often, the term "panorama" is assumed to mean an image will be a wide horizontal or vertical view, but that's not necessarily the case. If several photos are stitched together and the end result is a standard 3:2 ratio, or even a square, it can still be considered a high-resolution panoramic photograph.
A single image can be cropped so the height/width ratio resembles a panorama, but there are two downsides to this: 1) The resolution remaining will limit your ability to create large prints, as most modern cameras are limited to about 24x36 and smaller print sizes; 2) Because you're cropping a single photo, probably taken with a wide-angle lens, it will lack the telephoto compression that gives most multiple-image panoramas their depth and scale. More commonly, a panoramic image is the combination of multiple images, joined using stitching software, to create one single merged image.
This article is about the latter technique and how I go about shooting these images and stitching them. There are two approaches to multiple-image panoramas, single-row and multi-row. I'll cover both techniques and the required gear to accomplish these methods.
Single-Row Or Multi-Row Panoramic Choices
Single-row panoramas require the merging, or stitching, of the sequential edges of two or more images. This can be done horizontally or vertically. I suggest you learn to master single-row panoramas before moving onto multi-row because the accuracy needed with multi-rows is more complex than with single-row panos.
Multi-row panoramic images require the merging (stitching) of both sequential edges of images and their neighboring sequenced images in the adjacent rows. Multi-row panoramas are certainly more difficult to shoot and merge, due to the greater likelihood of error. Much like a puzzle, each image must have the correct alignment in order for it to "fit" into its unique location of the scene.
 |
 |
| Once he has captured the individual images, Oachs has to complete the stitching process. It's critical that exposures are the same from frame to frame or the final image won't look right. Oachs shoots RAW files and makes global adjustments, then he merges the photos using Photoshop's Photomerge function. | |
Camera Settings
Manual. Manual. Manual. I can't stress enough that you'll need to shoot your panoramas with all manual settings.
Aperture and shutter speed should be set manually. You should shoot in manual mode so that as you pan through the scene, the aperture and shutter remain consistent. I tend to use higher apertures (ƒ/11 to ƒ/18) depending on the complexity of the scene and distances. For shutter speed, I'll take a few test photos of the brightest area of the scene I'm about to capture and expose for that area. It's critically important that each frame is uniform in settings so that when it comes time to stitch your photos, they not only line up properly, but they seamlessly transition in exposure and depth of field.
Focus is a critical step to ensuring your panos will stitch together properly. Any change in focus and depth of field between two images can cause a stitching algorithm to fail to match two overlapping frames. I often use autofocus to lock onto an area of the panoramic scene where my focus is at, or near, infinity, and then switch my focus to manual to ensure the lens doesn't refocus between each image.
White balance should be set manually using the Kelvin setting in your camera's menu system. Choose a Kelvin temperature that best represents the scene or gives you the creativity you desire. If you don't set the white balance manually, then the camera will be left to choose the temperature of each frame, and this will lead to images that won't stitch together, or if they do, the colors won't match up. This is most noticeable in images that have vibrant colors and in the sky.
Filters should be avoided with the exception of a solid neutral-density (ND) filter or an ultraviolet (UV) filter.
Shooting in RAW is recommended so that you have the most data for post-processing changes once the shoot is complete. For example, I'll load all the RAW images of the panoramic scene into Photoshop or Lightroom and make global changes to white balance, contrast and sharpness before starting the stitching process.
 |
 |
Eliminating Parallax: Finding The Nodal Point
The nodal point, also known as the no-parallax point, is the most critical element to the entire panoramic process. The elimination of parallax helps ensure that panoramic software can effectively stitch together the images and leave you with a scene that's not bowed or skewed unnaturally.
What is "parallax?" It's the difference, or displacement, in an object's apparent position viewed along two different lines of sight. This effect is most noticeable with subject matter closer to the camera and becomes less insignificant at greater distances. If you've ever tried to take a panoramic image with three to five frames just with a regular tripod, the end result likely looked very distorted or bowed. This is a side effect of not eliminating parallax, and the stitching software is trying to accommodate the images by warping the image to force it to line up. Needless to say, the end result isn't very pleasing and is of poor quality.
 Proper nodal point alignment is important for best results. If the nodal point shifts from frame to frame, an unacceptable amount of distortion becomes apparent in the final stitched image. Oachs uses a Really Right Stuff multi-row panorama kit to keep perfect alignment. |
Once you have your nodal panoramic gear set up and the camera mounted, you simply slide the nodal rail forward, or back, to adjust the nodal point within the lens to be exactly over the pivot point of the tripod.
If it's not marked, an easy way to find the nodal point of the lens is to put two vertical elements in front of the lens, say, two chess pieces on the kitchen table a few feet apart. Then, move the camera back or forward on the nodal bar until the two verticals don't move in relationship to each other as you pan left to right. If you're behind the nodal point, the front alignment object will move in the same direction. If you're in front of the nodal point, the front alignment object will move in the opposite direction.
Shooting A Panoramic Photograph
Once you choose your location, it's time to shoot! You'll want a sturdy tripod with a bubble level or a panoramic head that has a bubble level built into it.
You're going to shoot your images from left to right. If you're shooting a multi-row panorama, then you'll shoot left to right, return to the left-most position and tilt down for the next row. It's just like reading a book.
Once your gear is positioned, it's time to get set up for a proper exposure. Shoot entirely in manual. I set the exposure by finding the brightest area in my scene and setting exposure based on that. This way, I'm sure not to have clipping areas in my final stitch.
Before I start shooting, I like to look at the scene with my eyes to identify a portion of the landscape that's going to make the best image. I pick a starting location on the left and right, and then I plan to shoot a little extra on both sides. I do the same for the top and bottom of multi-row images to account for some cropping in the stitching and processing steps.
Next, I decide how much I need to pan between frames. This depends on the distance of the landscape and the focal length of the lens. I find that for the best stitching results, an overlap between images of 20% to 25% is perfect. Most panoramic nodal gear will have degree markers, so I like to find a starting point, then pan while looking through the viewfinder and pick some element in the scene as a reference point for overlap. These practice pans help me decide how many degrees to move between each photo. Once I have the number of degrees to pan, then it's very easy to pan through a row efficiently without looking through the viewfinder.
For multi-row panoramic images, you'll want to practice panning left to right, and tilting up and down. This way, when you reach the right side of your first row you know exactly the degree marker to return to on the left, as well as how many degrees down you need to pan. Then, simply repeat.
You should move methodically and accurately through each frame. Depending on the amount of available light, clouds moving in the sky or shifting light, you may need to move quickly. Too much exposure change between images and rows will result in a failed stitch later. I highly encourage taking several sets of images. Just one single incorrect frame is like a missing piece to a jigsaw puzzle. A final image won't be possible.
Stitching: Merging Your Single Images Into A Panorama
Now that you have some images, it's time to download them to your computer and stitch them together to create one very large single photograph. There are many software programs for stitching photos together; my personal preference is Photoshop.
| Gear: Camera, Tripod And Nodal Systems There's no shortage of great equipment options out there, and for a variety of budgets. Here's what you're going to need to shoot professional-quality panoramic photographs: > A DSLR camera. Full frame, high quality and as many megapixels as you can get. > A fixed lens. I typically use 50mm, 85mm, 100mm or 300mm lenses. I've even used a 500mm lens! (You can use a zoom lens; however, eliminating parallax can be more difficult that way.) > A sturdy tripod. I recommend a ballhead for ease-of-use and leveling accuracy, which is important. > A panning system. Really Right Stuff makes a single- and multi-row pano kit, which is what I use for all of my panoramic creations. It's well made and top of the line, in my opinion. You can also automate the process with a GigaPan setup (see sidebar). > Shutter-release cord. Optional, but helpful in capturing sharper images. |
Global Adjustment Of RAW Images. The first step is to load all of the RAW files into the Camera Raw editor. By loading them at the same time, and selecting them all once loaded, you're able to make global edits. In other words, if you make an adjustment to any slider, say, contrast or white balance, this change will occur identically to all of the images of your panorama. This is a critically important point because, in order to have a successful stitch, each image has to be as similar to the next as possible. Any shift in exposure or other adjustments can cause the software to fail to pattern match, thus the stitch won't complete.
The Stitch. In Photoshop, choose File > Automate > Photomerge. From the dialog box, select the group of images, then select the Layout as Auto and Blend Images Together. If I later discover that I didn't do a great job of setting the nodal point during the shoot, I'll check Geometric Distortion Correction to help assist with the parallax issues. It's not perfect, but can often wrangle a difficult stitch into something manageable.
The Vignette Removal option is typically only selected when shooting wide-angle where, for example, the gradient blue of the sky can affect the stitch between two frames. Since I tend to shoot 50mm or higher, this isn't an option I use in my personal stitching process.
The Wait. Once you click OK, Photoshop starts the process of loading each frame of your soon-to-be panorama, each into its own separate layer. Once this step is completed, Photoshop will rearrange and adjust each frame, using powerful algorithms to match edges and overlap each photo. Then, once each image is in position, the software will create layer masks for a seamless final result.
This may be a good time to grab a cold beverage or take the dog for a walk. Depending on the number of images in your pano, this processing can take anywhere from a few minutes to a few hours.
| GigaPan EPIC For Automatic Gigapixel Shooting
|
|
| Stephen Oachs makes his gigapixel images manually. If you'd prefer to have an automated way of creating these sorts of massive files, GigaPan makes a variety of robotic tools that will do all of the shooting for you and their GigaPan Stitch software will then take care of all of the stitching.
The GigaPan EPIC Pro model is designed for DSLRs. Mount the unit on your tripod, set the upper-left and lower-right corners, and the robot does the rest. The EPIC Pro costs $895. If you want to try automated gigapixel photography at a lower cost, the EPIC model handles most compact cameras and costs $299. Go to gigapan.com for details and to see if your camera is supported. |
Cropping. If all went well, you're well hydrated and the dog got his exercise, you should have one big photo! However, it may look a little bowed around the edges. The more accurate you are in finding the nodal point during the shoot, the less parallax each frame will have and the straighter your final stitched edges will be. If you have a lot of bow around the edges, the more parallax you had, and you'll need to do some extra work to correct the final result.
If the bow is minimal, you can make a quick crop, then flatten, and your panorama is stitched and complete. However, if you have a lot of curvature, you may need to flatten the layers and use Edit > Transform tools (such as Warp and Perspective) to adjust for the curve. In my experience, I've learned to use these tools sparingly to keep the photo looking natural and to avoid degrading the quality of the stitched image.
Final Postprocessing. Now that you have a successful stitch and you've flattened the layers, you have a single and very large photograph. I typically apply a couple of last postprocessing steps at this point, such as sharpening and sometimes a slight contrast or levels adjustment. I have, from time to time, arrived at this final step, and once I see all the images combined, recognize I could have done a better job with the initial group RAW adjustments, and I start over by making those adjustments to my RAW files collectively, then redo the stitching steps.
Quality Versus Quantity. Often, when you see multi-row panoramic images around the Internet, they're many gigapixels in size as the result of the stitching of hundreds of photos. While this provides a fantastic game of "Where's Waldo?", it can be overkill and the images might not be ideally suited to printing.
Another challenge with producing high-quality multi-row panoramic images has to do with the amount of time it takes to pan through the scene and capture each image. If you estimate it takes three to five seconds per image to pan, let the vibration subside, then take the photo; a multi-row panorama of just 24 images takes nearly two minutes. Now imagine 60 images would take four to five minutes. While time is passing as you shoot, the clouds are moving, the wind is blowing, and the sun is on the move, shifting exposure and shadows. The amount of frames you choose for your panorama helps determine the type of conditions you need for a quality end result.
My goal with multi-row panoramas is to provide my viewers with bigger print size options, but with the same fine-art print quality you'd expect from a single frame. A multi-row panorama of just 24 images produces enough combined resolution for stunningly large prints 10 to 15 feet wide and larger.
 |
If you're not into printing and want to capture the tiniest detail in the expanse of a scene, then shoot away! I've seen some amazing gigapixel panoramas with an amazing amount of fun details to seek and explore.
The founder of Aperture Academy, Stephen Oachs is a photographer, gallery owner and workshop leader. You can see more of his work and sign up for his workshops at www.apertureacademy.com. and www.stephenoachs.com.